
3-for-1 Rotisserie Chicken
Doesn't it feel good to get the most out of your energy? All of us want to get the biggest bang for our buck - both from the perspective of money as well as time - and nothing does that quite as well as a simple rotisserie chicken. With just a few extra steps, one whole roaster chicken can turn into three delicious and nutritious meals.
Especially as cooler weather befalls and Thanksgiving approaches, my family loves a good roasted bird. Unfortunately, I don’t typically have a whole day to dedicate to the process of basting, watching, waiting. Plus, part of the reason that we love Thanksgiving is for all of the leftovers! No one has to cook for days!
Like magic, with just a few extra steps, one roaster chicken can turn into three meals.
Fortunately, Roasted chicken turns out to be pretty foolproof in a slow cooker (you can also use an instant pot if you prefer), and the chicken that remains on your bird can help generate two other meals.

Roasted chicken can be cooked in the oven, like this one, or - for a less hands-on approach, in your slow cooker or instant pot.
For those of us who are looking to save some money, eat cleanly, and be efficient with time, this my favorite trick.
Step 1: Slow-Cooker Rotisserie Chicken
(Photo Credit: oneordinaryday.wordpress.com)
Hands-on time for this meal is less than 15 minutes, and it'll look and taste like you spent all day in the kitchen.
Ingredients:
1 whole roasting chicken, (organic, if possible)
1 large onion, chopped into large wedges
1 lemon, sliced into 8 pieces
1 bunch poultry herbs (sage, thyme, or rosemary are my favorites)
Olive oil
Paprika (to taste)
Salt/Pepper (to taste)
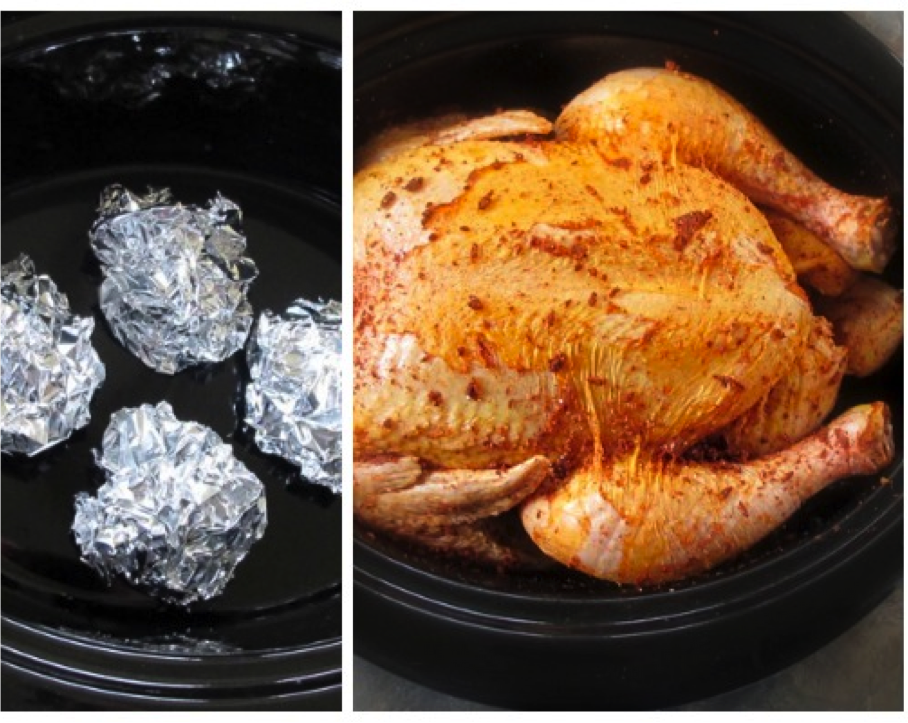
Prepare your slow cooker by wadding up four balls of aluminum foil and placing them at the bottom.
Rinse your chicken, removing anything from inside the cavity. Pat dry. Fill the cavity with half of the lemon and onion wedges; add preferred poultry herbs. Place the prepared chicken on top of the aluminum foil balls. Add remaining onion and lemon wedges around the outside of the chicken.
Drizzle the top of the chicken with olive oil and spread to cover in a thin coat. Sprinkle the top with paprika, salt and pepper, to taste. Cover and roast on high for 4 - 6 hours or on low from 6 - 8 hours until cooked.
Step 2: Homemade Bone Broth
Once you've enjoyed the chicken from the crockpot, you'll have some leftovers - both on the chicken and in the crockpot. Here's how you turn pan drippings and bones into amazing bone broth.

Use Your Veggie Scraps!
Over the course of the week as I prepare other meals, I often have trimmings from vegetables (like potato and carrot peelings, ends of celery stalks, skins from onions, bottoms of button mushrooms). Throw these into a freezer bag and use them as your vegetables for bone broth - it saves money (no wasted scraps!), time (no chopping or sorting for veggies while making broth!), and adds a little variety to your broth (it'll always be different and delicious!)
You'll need the vegetables, such as:
Carrots
Onions
Celery
Herbs
Mushrooms
Some broccoli or kale (not too much of this; just a handful)
Garlic
Bay leaves
Peppercorns
Anything else you enjoy!
Gather the trimmings from vegetables in a freezer bag - it saves money and time when I make my bone broth!
Remove all the meat from the chicken bones, making sure to separate fat and ligaments from the bones. Put the bones in a bowl, the meat in a separate bowl, and the skin/fat/etc in the garbage.
Remove the aluminum foil from the pan drippings and skim off any obvious fat from the top (note, you'll be able to do this again after the broth is made, so don't worry if you don't get a lot here).
Add the bones back into the crock pot with the drippings. Add vegetables and a tablespoon of apple cider vinegar (this helps remove minerals from the bones). Just cover with water and simmer for 6 - 8 hours on low (I typically do this overnight).
Once the broth has simmered, strain and refrigerate. Once cooled, skim remaining fat from the top. Store in airtight containers in the fridge (3-5 days) or the freezer (up to 3 months).
Bone broth forms the foundation of incredible soups, stews, risottos, and other dishes!
Step 3: Waldorf Chicken Salad

Once you've removed the extra chicken from the bird, you're probably going to have about two cups of somewhat-shredded chicken pieces.
These leftovers make an incredible Waldorf Chicken Salad with just a few extra ingredients.
My recipe is an amalgamation of many recipes I've seen over the years, tweaked to be just a little healthier. Don’t like grapes? Try bing cherries with the pits removed! Walnuts not your thing? Try pecans or almonds instead.
I’ve also tried this a few times without mayo and I have to admit, it does need a little bit of fat or oil. If mayo isn’t for you, try avocado oil or extra-virgin olive oil as a replacement to retain moisture.
Ingredients:
2 cups shredded cooked rotisserie chicken
1 cup red grapes, sliced
1 cup chopped celery
1 cup chopped apple (I use honeycrisp, but use your favorite variety!)
1/2 cup chopped walnuts
2/3 cup Greek yogurt
3 Tbsp mayonnaise (you can omit, but I've found that it adds creaminess and moisture)
Salt and pepper, to taste
Mix together all ingredients. Enjoy on multigrain bread or pita, or atop a bed of baby greens!